In this blog we shall learn about:
- Containers and Persistent Storage
- About Kubernetes
- Terminology and background
- Our approach
- Setting up
- Conclusion
- References
Containers and Persistent Storage
As we all know containers are stateless entities which are used to deploy applications and hence need persistent storage to store application data for availability across container incarnations.
Persistent storage in containers are of two types, shared and non-shared.
Shared storage:
Consider this as a volume/store where multiple Containers perform both read and write operations on the same data. Useful for applications like web servers that need to serve the same data from multiple container instances.
Non Shared Storage:
Only a single container can perform write operations to this store at a given time.
This blog will explain about Non Shared Storage for Kubernetes using gluster.
About Kubernetes
Kubernetes (k8s) is an open source container cluster manager. It aims to provide a “platform for automating deployment, scaling, and operations of application containers across clusters of hosts”.
In simple words, It works on server and client model, manages to clusterize docker and schedules containers(pods) for application deployment. k8s uses flannel to create networking between containers, it has load balance integrated, it uses etcd for service discovery, and so on.
Pod:
Pod is a smallest deployable unit that can be created and managed in Kubernetes.
This could be one or more containers working for an application.
Nodes/Minions:
Node is a slave machine in Kubernetes, previously known as Minion. Each node has the services necessary to run Pods and is managed by the k8s master. The services on a node include {docker, flannel, kube-proxy and kubelet }.
Master:
The managing machine, which oversees one or more minions/nodes. The services on master include {etcd, kube-apiserver, kube-controller-manager and kube-scheduler}
Services:
kube-apiserver – Provides the API for Kubernetes orchestration.
kube-controller -manager – Enforces Kubernetes services.
kube-scheduler – Schedules pods on hosts.
kubelet – Parse PodSpecs and ensures that the containers running as described.
kube-proxy – Provides network proxy services.
etcd – A highly available key-value store for shared configuration and service discovery.
flannel – An etcd backed create networking between containers
Terminology and background
Refer to ‘Terminology and background’ section from our previous post
Our Approach
With all the background discussed above now I shall jump into actual essence of this blog and explain how we can expose the file in gluster volume as a nonshared persistent storage in kubernetes pods.
The Current version of Kubernetes v1.2.x does not provide/understand multipathing, this patch got merged in v1.3.alpha3 release, hence in-order to use multipathing we need to wait for v1.3.0.
Hence, In this blog I’m going with multipath disabled, once k8s v1.3.0 is out I shall update the blog to have multipath changes.
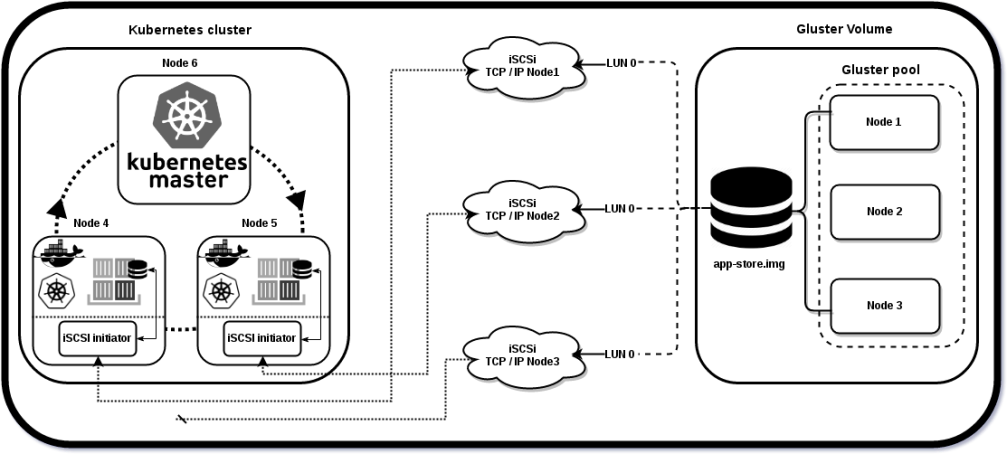
In our approach all the kubernetes nodes initiate the iSCSI session, attaches iSCSI target as block device and serve it to Kubernetes pod where the application is running and requires persistent storage.
Now without any delay let me walk through the setup details…
Setting Up
You need 6 nodes for setting this up, 3 acts as gluster nodes where the iSCSI target is served from and 1 as k8s master and other 2 as the iSCSI initiators which also acts as k8s nodes.
- We create a gluster replica 3 volume using the 3 nodes {Node1, Node2 and Node3}.
- Define iSCSI target using the same nodes, expose ‘LUN’ from each of them.
- Use Node 4 and Node 5 as as iSCSI initiators, by logging-in to the iSCSI target session created above (No multipathing)
- Setup k8s cluster by using {Node4, Node5 and Node6}, Node 6 is master and other 2 are slaves
- From Node 6 create the pod and examine the iSCSI target device mount inside it.
Gluster and iSCSI target Setup
On all the nodes I have Installed freshly baked fedora 24 Beta server.
Perform below on all the 3 gluster nodes:
# dnf upgrade
# dnf install glusterfs-server
got 3.8.0-0.2.rc2.fc24.x86_64
# iptables -F
# vi /etc/glusterfs/glusterd.vol
add 'option rpc-auth-allow-insecure on' this is needed by libgfapi
# systemctl start glusterd
On Node 1 perform below:
# form a gluster trusted pool of nodes
[root@Node1 ~]# gluster peer probe Node2
[root@Node1 ~]# gluster peer probe Node3
[root@Node1 ~]# gluster pool list
UUID                                    Hostname        State
51023fac-edc7-4149-9e3c-6b8207a02f7e    Node1   *Connected
ed9af9d6-21f0-4a37-be2c-5c23eff4497e    Node2    Connected
052e681e-cdc8-4d3b-87a4-39de26371b0f    Node3    Connected
 `
# create volume
[root@Node1 ~]# gluster vol create nonshared-store replica 3 Node1:/subvol1 Node2:/subvol2 Node3:/subvol3 force

# volume set to allow insecure port ranges
[root@Node1 ~]# gluster vol set nonshared-store server.allow-insecure on

# start the volume
[root@Node1 ~]# gluster vol start nonshared-store
[root@Node1 ~]# gluster vol status
check the status

# mount volume and create a required target file of 8G in volume
[root@Node1 ~]# mount -t glusterfs Node1:/nonshared-store /mnt
[root@Node1 ~]# cd /mnt
[root@Node1 ~]# fallocate -l 8G app-store.img

# finally unmount the volume
[root@Node1 ~]# umount /mnt
Now we have done with the gluster setup, lets expose file ‘app-store.img’ as an iSCSI target by creating a LUN
Again On Node 1:
[root@Node1 ~]# dnf install tcmu-runner targetcli

# enter the admin console
[root@Node1 ~]# targetcli
targetcli shell version 2.1.fb42
Copyright 2011-2013 by Datera, Inc and others.
For help on commands, type 'help'.
/> ls
o- / ...................................................... [...]
  o- backstores ........................................... [...]
  | o- block ............................... [Storage Objects: 0]
  | o- fileio .............................. [Storage Objects: 0]
  | o- pscsi ............................... [Storage Objects: 0]
  | o- ramdisk ............................. [Storage Objects: 0]
  | o- user:glfs ........................... [Storage Objects: 0]
  | o- user:qcow ........................... [Storage Objects: 0]
  o- iscsi ......................................... [Targets: 0]
  o- loopback ...................................... [Targets: 0]
  o- vhost ......................................... [Targets: 0]

# Create a Image file with the name "glfsLUN" on gluster volume with 8G
/> cd /backstores/user:glfs
/backstores/user:glfs> create glfsLUN 8G nonshared-store@Node1/app-store.img
Created user-backed storage object glfsLUN size 8589934592.

# create a target
/backstores/user:glfs> cd /iscsi/
/iscsi> create iqn.2016-06.org.gluster:Node1
Created target iqn.2016-06.org.gluster:Node1.
Created TPG 1.
Global pref auto_add_default_portal=true
Created default portal listening on all IPs (0.0.0.0), port 3260.

# set LUN
/iscsi> cd /iscsi/iqn.2016-06.org.gluster:Node1/tpg1/luns
/iscsi/iqn.20...de1/tpg1/luns> create /backstores/user:glfs/glfsLUN 0
Created LUN 0.
/iscsi/iqn.20...de1/tpg1/luns> cd /
# set ACL (it's the IQN of an initiator you permit to connect)
# Copy InitiatorName from Docker host machine
# which will be in ‘/etc/iscsi/initiatorname.iscsi’
# In my case it is the one put in bold at next commands
/> cd /iscsi/iqn.2016-06.org.gluster:Node1/tpg1/acls
/iscsi/iqn.20...de1/tpg1/acls> create iqn.1994-05.com.redhat:8277148d16b2
Created Node ACL for iqn.1994-05.com.redhat:8277148d16b2
Created mapped LUN 0.

# set UserID and password for authentication
/iscsi/iqn.20...de1/tpg1/acls> cd iqn.1994-05.com.redhat:8277148d16b2
/iscsi/iqn.20...:8277148d16b2> set auth userid=username
Parameter userid is now 'username'.
/iscsi/iqn.20...:8277148d16b2> set auth password=password
Parameter password is now 'password'.
/iscsi/iqn.20...:8277148d16b2> cd /

/> saveconfig
Last 10 configs saved in /etc/target/backup.
Configuration saved to /etc/target/saveconfig.json

/> exit
Global pref auto_save_on_exit=true
Last 10 configs saved in /etc/target/backup.
Configuration saved to /etc/target/saveconfig.json
Now On Node 2:
[root@Node2 ~]# dnf install tcmu-runner targetcli

# enter the admin console
[root@Node2 ~]# targetcli
targetcli shell version 2.1.fb42
Copyright 2011-2013 by Datera, Inc and others.
For help on commands, type 'help'.
/> ls
o- / ...................................................... [...]
  o- backstores ........................................... [...]
  | o- block ............................... [Storage Objects: 0]
  | o- fileio .............................. [Storage Objects: 0]
  | o- pscsi ............................... [Storage Objects: 0]
  | o- ramdisk ............................. [Storage Objects: 0]
  | o- user:glfs ........................... [Storage Objects: 0]
  | o- user:qcow ........................... [Storage Objects: 0]
  o- iscsi ......................................... [Targets: 0]
  o- loopback ...................................... [Targets: 0]
  o- vhost ......................................... [Targets: 0]

# create a Image file with the name "glfsLUN" on gluster volume with 8G
/> cd /backstores/user:glfs
/backstores/user:glfs> create glfsLUN 8G nonshared-store@Node2/app-store.img
Created user-backed storage object glfsLUN size 8589934592.

# create a target
/backstores/user:glfs> cd /iscsi/
/iscsi> create iqn.2016-06.org.gluster:Node2
Created target iqn.2016-06.org.gluster:Node2.
Created TPG 1.
Global pref auto_add_default_portal=true
Created default portal listening on all IPs (0.0.0.0), port 3260.

# set LUN
/iscsi> cd /iscsi/iqn.2016-06.org.gluster:Node2/tpg1/luns
iscsi/iqn.20...de2/tpg1/luns> create /backstores/user:glfs/glfsLUN 0
Created LUN 0.
iscsi/iqn.20...de2/tpg1/luns> cd /

# set ACL (it's the IQN of an initiator you permit to connect)
# Copy InitiatorName from Docker host machine
# which will be in ‘/etc/iscsi/initiatorname.iscsi’
# In my case it is the one put in bold at next commands
/> cd /iscsi/iqn.2016-06.org.gluster:Node2/tpg1/acls
/iscsi/iqn.20...de2/tpg1/acls> create iqn.1994-05.com.redhat:8277148d16b2
Created Node ACL for iqn.1994-05.com.redhat:8277148d16b2
Created mapped LUN 0.

# set UserID and password for authentication
/iscsi/iqn.20...de2/tpg1/acls> cd iqn.1994-05.com.redhat:8277148d16b2
/iscsi/iqn.20...:8277148d16b2> set auth userid=username
Parameter userid is now 'username'.
/iscsi/iqn.20...:8277148d16b2> set auth password=password
Parameter password is now 'password'.
/iscsi/iqn.20...:8277148d16b2> cd /

/> saveconfig
Last 10 configs saved in /etc/target/backup.
Configuration saved to /etc/target/saveconfig.json

/> exit
Global pref auto_save_on_exit=true
Last 10 configs saved in /etc/target/backup.
Configuration saved to /etc/target/saveconfig.json
Note: Replicate Node2 setup on Node3 as well, skipping to avoid duplication
iSCSI initiator Setup
On Node4 and Node 5:
[root@Node4 ~]# dnf upgrade
[root@Node4 ~]# dnf install iscsi-initiator-utils sg3_utils

# change to the same IQN you set on the iSCSI target server
[root@Node4 ~]# vi /etc/iscsi/initiatorname.iscsi
InitiatorName=iqn.1994-05.com.redhat:8277148d16b2

[root@Node4 ~]# vi /etc/iscsi/iscsid.conf
# uncomment below line
node.session.auth.authmethod = CHAP
[...]
# uncomment and edit username and password if required
node.session.auth.username = username
node.session.auth.password = password

[root@Node4 ~]# systemctl restart iscsid
[root@Node4 ~]# systemctl enable iscsid

# make sure multipath is disabled (kubernetes <= 1.2.x doesn't support)
[root@Node4 ~]# systemctl stop multipathd

# One way of Login to the iSCSI target
[root@Node4 ~]#  iscsiadm -m discovery -t st -p Node1 -l
Node1:3260,1 iqn.2016-06.org.gluster:Node1
Logging in to [iface: default, target: iqn.2016-06.org.gluster:Node1, portal: Node1,3260] (multiple)
Login to [iface: default, target: iqn.2016-06.org.gluster:Node1, portal: Node1,3260] successful.

[root@Node4 ~]#  iscsiadm -m discovery -t st -p Node2 -l
Node2:3260,1 iqn.2016-06.org.gluster:Node2
Logging in to [iface: default, target: iqn.2016-06.org.gluster:Node2, portal: Node2,3260] (multiple)
Login to [iface: default, target: iqn.2016-06.org.gluster:Node2, portal: Node2,3260] successful.

[root@Node4 ~]#  iscsiadm -m discovery -t st -p Node3 -l
Node3:3260,1 iqn.2016-06.org.gluster:Node3
Logging in to [iface: default, target: iqn.2016-06.org.gluster:Node3, portal: Node3,3260] (multiple)
Login to [iface: default, target: iqn.2016-06.org.gluster:Node3, portal: Node3,3260] successful.

# here you see that three paths appered as different devices,
# hence we dont have multipathing
[root@Node4 ~]# lsblk
NAME MAJ:MIN RM SIZE RO TYPE MOUNTPOINT
sda 8:0  0 8G 0 disk
sdb 8:16 0 8G 0 disk
sdc 8:32 0 8G 0 disk
[...]
Note: Replicate Node 4 steps on Node 5 as well, since it will be also an iSCSI initiator.
Format the device to with xfs.
On any one, among Node 4 and Node 5 perform below:
[root@Node5 ~]# mkfs.xfs -f /dev/sda
meta-data=/dev/sda           isize=512   agcount=4, agsize=327680 blks
         =                   sectsz=512  attr=2, projid32bit=1
         =                   crc=1       finobt=1, sparse=0
data     =                   bsize=4096  blocks=1310720, imaxpct=25
         =                   sunit=0     swidth=0 blks
naming   =version 2          bsize=4096  ascii-ci=0 ftype=1
log      =internal log       bsize=4096  blocks=2560, version=2
         =                   sectsz=512  sunit=0 blks, lazy-count=1
realtime =none               extsz=4096  blocks=0, rtextents=0

[root@Node5 ~]# mount /dev/sda /mnt
[root@Node5 ~]# touch /mnt/{1..10}
[root@Node5 ~]# umount /mnt
Kubernetes Master and Nodes Setup
Installing Kubernetes Cluster with 2 nodes/minions.
On K8s Master:
[root@Node6 ~]# dnf upgrade # Disable iptables to avoid conflicts with Docker iptables rules: [root@Node6 ~]# systemctl stop firewalld [root@Node6 ~]# systemctl disable firewalld Removed symlink /etc/systemd/system/dbus-org.fedoraproject.FirewallD1.service. Removed symlink /etc/systemd/system/basic.target.wants/firewalld.service. # Install NTP and make sure it is enabled and running [root@Node6 ~]# dnf -y install ntp [root@Node6 ~]# systemctl start ntpd [root@Node6 ~]# systemctl enable ntpd# Install etcd and Kubernetes [root@Node6 ~]# dnfinstalletcd kubernetes got Kubernetes with GitVersion:"v1.2.0" # Configure etcd # Ensure the following lines are uncommented, and assign the given values:[root@Node6 ~]#vi /etc/etcd/etcd.confETCD_NAME=defaultETCD_DATA_DIR="/var/lib/etcd/default.etcd"ETCD_LISTEN_CLIENT_URLS="http://0.0.0.0:2379"ETCD_ADVERTISE_CLIENT_URLS="http://localhost:2379"# Configure Kubernetes API server # Ensure the following lines are uncommented, and assign the given values:[root@Node6 ~]#vi /etc/kubernetes/apiserverKUBE_API_ADDRESS="--address=0.0.0.0"KUBE_API_PORT="--port=8080"KUBELET_PORT="--kubelet_port=10250"KUBE_ETCD_SERVERS="--etcd_servers=http://127.0.0.1:2379"KUBE_SERVICE_ADDRESSES="--service-cluster-ip-range=10.254.0.0/16"KUBE_ADMISSION_CONTROL="--admission_control=NamespaceLifecycle,NamespaceExists,LimitRanger,ResourceQuota"KUBE_API_ARGS=""# start and enable etcd, kube-apiserver, kube-controller-manager and kube-schedule[root@Node6 ~]# \forSERVICESinetcd kube-apiserver kube-controller-manager kube-scheduler;dosystemctl restart $SERVICESsystemctlenable$SERVICESsystemctl status $SERVICESdone # Define flannel network configuration in etcd. # This configuration will be pulled by flannel service on nodes [root@Node6 ~]# etcdctl mk /atomic.io/network/config '{"Network":"172.17.0.0/16"}' # At this point the below should show nothing because we have not configured nodes yet [root@Node6 ~]# kubectl get nodes
On K8s Nodes/Minions:
# Disable iptables to avoid conflicts with Docker iptables rules: [root@Node4 ~]# systemctl stop firewalld [root@Node4 ~]# systemctl disable firewalld Removed symlink /etc/systemd/system/dbus-org.fedoraproject.FirewallD1.service. Removed symlink /etc/systemd/system/basic.target.wants/firewalld.service. # Install NTP and make sure it is enabled and running [root@Node4 ~]# dnf -y install ntp [root@Node4 ~]# systemctl start ntpd [root@Node4 ~]# systemctl enable ntpd # disable selinux [root@Node4 ~]# setenforce 0 # Install flannel and Kubernetes [root@Node4 ~]# dnf install flannel kubernetes # Configure etcd server for flannel service. # Update this to connect to the respective master:[root@Node4 ~]# vi /etc/sysconfig/flanneldFLANNEL_ETCD="http://Node6:2379" # Configure Kubernetes default config[root@Node4 ~]# vi /etc/kubernetes/configKUBE_MASTER="--master=http://Node6:8080"# Configure kubelet service[root@Node4 ~]# vi /etc/kubernetes/kubeletKUBELET_ADDRESS="--address=0.0.0.0"KUBELET_PORT="--port=10250"# change the hostname to this kubnode IP addressKUBELET_HOSTNAME="--hostname_override=Node4"KUBELET_API_SERVER="--api_servers=http://Node6:8080"KUBELET_ARGS="" # Start and enable kube-proxy, kubelet, docker and flanneld services:[root@Node4 ~]# \forSERVICESinkube-proxy kubelet docker flanneld;dosystemctl restart $SERVICESsystemctlenable$SERVICESsystemctl status $SERVICESdone # On each minion/node, you should notice that you will have two new interfaces # added, docker0 and flannel0. You should get different range of IP addresses # on flannel0 interface on each minion/node, similar to below:[root@Node4 ~]# ip a | grep flannel | grep inet inet 172.17.21.0/16 scope global flannel0
Note: Replicate Node4 steps on Node 5 as well, since it is also a node/minion.
So far we are done with kubernetes cluster setup, lets get on to k8s master now and create a pod to showcase the file in gluster volume as a block device mounted for persistent storage.
Again on K8s Master:
[root@Node6 ~]# kubectl get nodes
NAME STATUS AGE
10.70.43.239 Ready    2m
10.70.43.242 NotReady 6s

# Don't worry with in a minute you should notice
[root@Node6 ~]# kubectl get nodes
NAME STATUS AGE
10.70.43.239 Ready 2m
10.70.43.242 Ready 32s

[root@Node6 ~]# cat > iscsi-pod.json
{
    "apiVersion": "v1",
    "kind": "Pod",
    "metadata": {
        "name": "glusterpod"
     },
     "spec": {
         "containers": [
             {
                 "name": "iscsi-rw",
                 "image": "fedora",
                 "volumeMounts": [
                     {
                         "mountPath": "/mnt/gluster-store",
                         "name": "iscsi-rw"
                     }
                 ],
                 "command": [ "sleep", " 100000" ]
            }
        ],
        "volumes": [
            {
                "name": "iscsi-rw",
                "iscsi": {
                    "targetPortal": "Node1:3260",
                    "iqn": "iqn.2016-06.org.gluster:Node1",
                    "lun": 0,
                    "fsType": "xfs",
                    "readOnly": false
                }
            }
        ]
    }
}
^C

# create the pod defined in the file
[root@Node6 ~]# kubectl create -f iscsi-pod.json
pod "glusterpod" created

[root@Node6 ~]# kubectl get event -w
[...]
2016-06-28 16:47:56 +0530 IST 2016-06-28 16:47:56 +0530 IST 1 glusterpod Pod Normal Scheduled {default-scheduler } Successfully assigned glusterpod to 10.70.43.239
2016-06-28 16:48:06 +0530 IST 2016-06-28 16:48:06 +0530 IST 1 10.70.43.239 Node Warning MissingClusterDNS {kubelet 10.70.43.239} kubelet does not have ClusterDNS IP configured and cannot create Pod using "ClusterFirst" policy. pod: "glusterpod_default(f6c763e5-3d21-11e6-bdd3-00151e000014)". Falling back to DNSDefault policy.
2016-06-28 16:48:06 +0530 IST 2016-06-28 16:48:06 +0530 IST 1 glusterpod Pod Warning MissingClusterDNS {kubelet 10.70.43.239} kubelet does not have ClusterDNS IP configured and cannot create Pod using "ClusterFirst" policy. Falling back to DNSDefault policy.
2016-06-28 16:48:07 +0530 IST 2016-06-28 16:48:07 +0530 IST 1 glusterpod Pod spec.containers{iscsi-rw} Normal Pulling {kubelet 10.70.43.239} pulling image "fedora"
[...]

[root@Node6 ~]# kubectl get pods
NAME       READY     STATUS        RESTARTS AGE
glusterpod  0/1  ContainerCreating     0    1m

# it takes some time to pull the image for the first time
[root@Node6 ~]# kubectl get pods
NAME       READY STATUS   RESTARTS AGE
glusterpod  1/1  Running     0     3m

# get into the pod
[root@Node6 ~]# kubectl exec -it glusterpod  bash

# Pod Shell
[root@glusterpod /]# df -Th
Filesystem Type Size Used Avail Use% Mounted on
[...]
/dev/sda    xfs 8.0G 33M   8.0G  1%  /mnt/gluster-store
[...]

[root@glusterpod /]# cd /mnt/gluster-store/
[root@glusterpod gluster-store]# ls
1 10 2 3 4 5 6 7 8 9
Conclusion
This just showcases how Gluster can be used as a distributed block store with Kubernetes cluster. More details about multipathing, integration with Openshift etc. will come by in further posts.
References
http://severalnines.com/blog/installing-kubernetes-cluster-minions-centos7-manage-pods-services
http://rootfs.github.io/iSCSI-Kubernetes/
http://blog.gluster.org/2016/04/using-lio-with-gluster/
https://docs.docker.com/engine/tutorials/dockervolumes/http://scst.sourceforge.net/scstvslio.html
http://events.linuxfoundation.org/sites/events/files/slides/tcmu-bobw_0.pdf
https://www.kernel.org/doc/Documentation/target/tcmu-design.txt
https://lwn.net/Articles/424004/
http://www.gluster.org/community/documentation/index.php/GlusterFS_Documentation

4 thoughts on “Non Shared Persistent Gluster Storage with Kubernetes”